TapeVault records production footage to LTO tape (LTFS), verifies every file, and lets you find and restore it later. This manual covers version 1.2.9 (Windows · macOS).
| System | What you need |
|---|---|
| Windows | 64-bit Windows 10/11 · IBM LTFS SDE (Spectrum/Storage Archive Single Drive Edition) · LTO drive and SAS HBA driver |
| macOS | Apple Silicon or Intel Mac · macOS 13 or later · LTFS · macFUSE · LTO drive and SAS HBA driver |
| Both | ffmpeg for video thumbnails (optional). Without a drive you can still try TapeVault with the local archive. |
Follow the Install Guide for the install order and drivers. On Windows, the TapeVault Install Assistant can check the PC first.
License activation
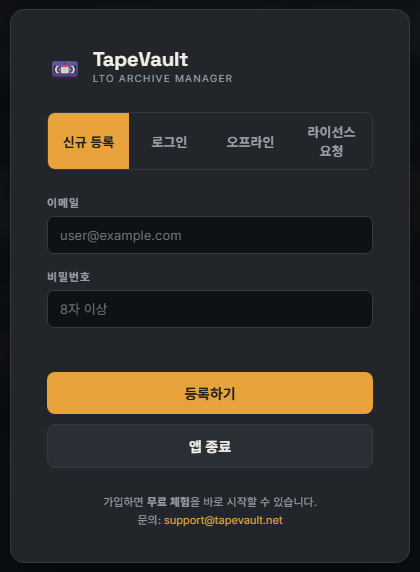
The license screen appears on first launch.
| Method | Steps |
|---|---|
| Sign up | Create an account with your email and a password (8+ characters); the 1-month trial starts right away. |
| Sign in | Sign in with an account that already has a license. The number of PCs you can register depends on the license (Copies). |
| Offline | For PCs without internet: send the Machine ID from the Offline tab to support@tapevault.net and load the license file (.tvlic) you receive. |
| License request | Request a purchase, renewal or edition change. Without internet, save a request file (.tvreq) and send it. |
Editions: Starter supports up to 2 drives; Autoloader has no drive limit and, on Windows, adds tape library (autoloader) control.
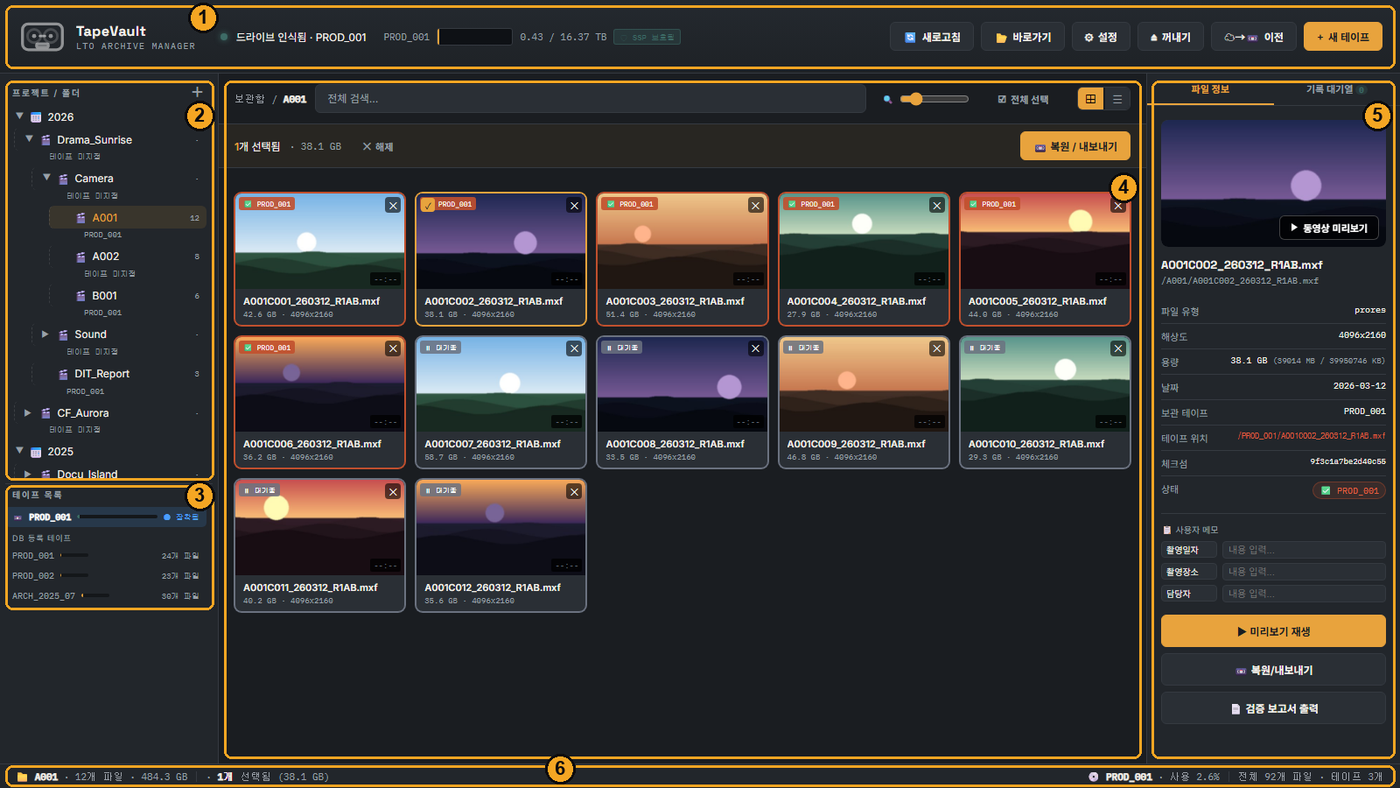
| Area | What it shows |
|---|---|
| Top bar | Drive status, tape name and usage, plus Refresh · 📂 Open · Settings · Eject · Migrate · New tape. With two drives each drive gets its own row; the row marked Active is the drive you are working with (click a row to switch). |
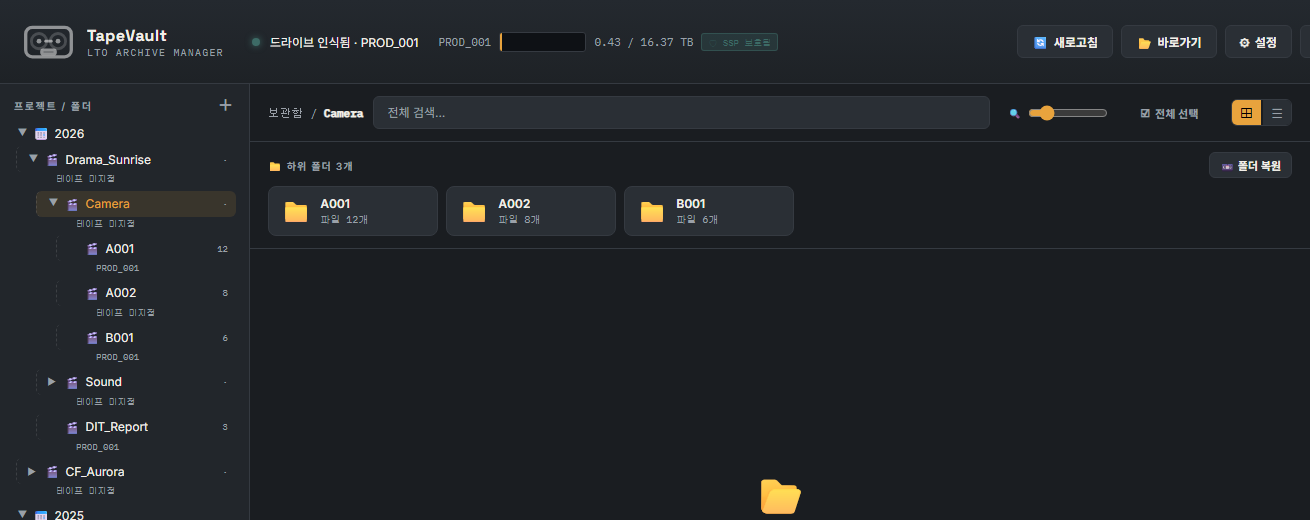
| Left: folder tree | The folder structure you archive into — it becomes the folder structure on tape. The tape list is below it. |
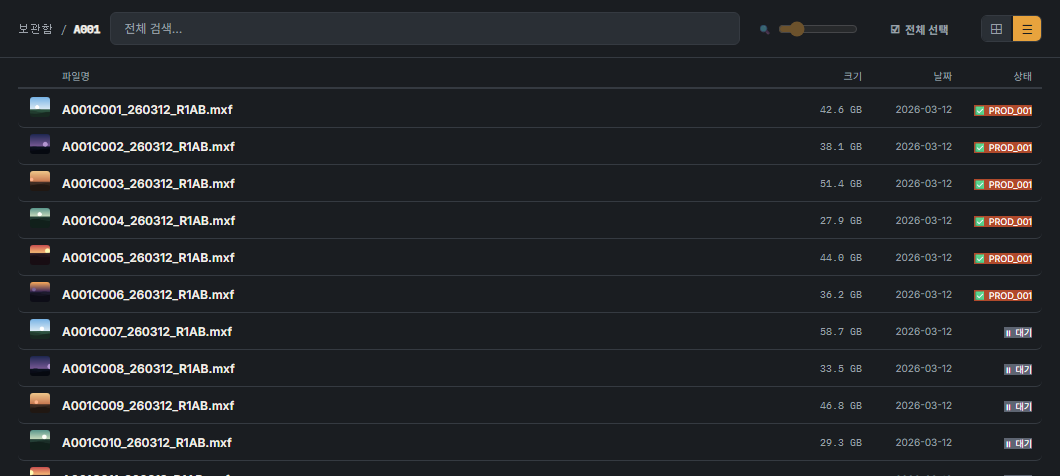
| Center: file cards | Files and subfolders of the selected folder. Status is shown by color and badge (Pending · Copying · Verifying · Done · Failed · Source missing). |
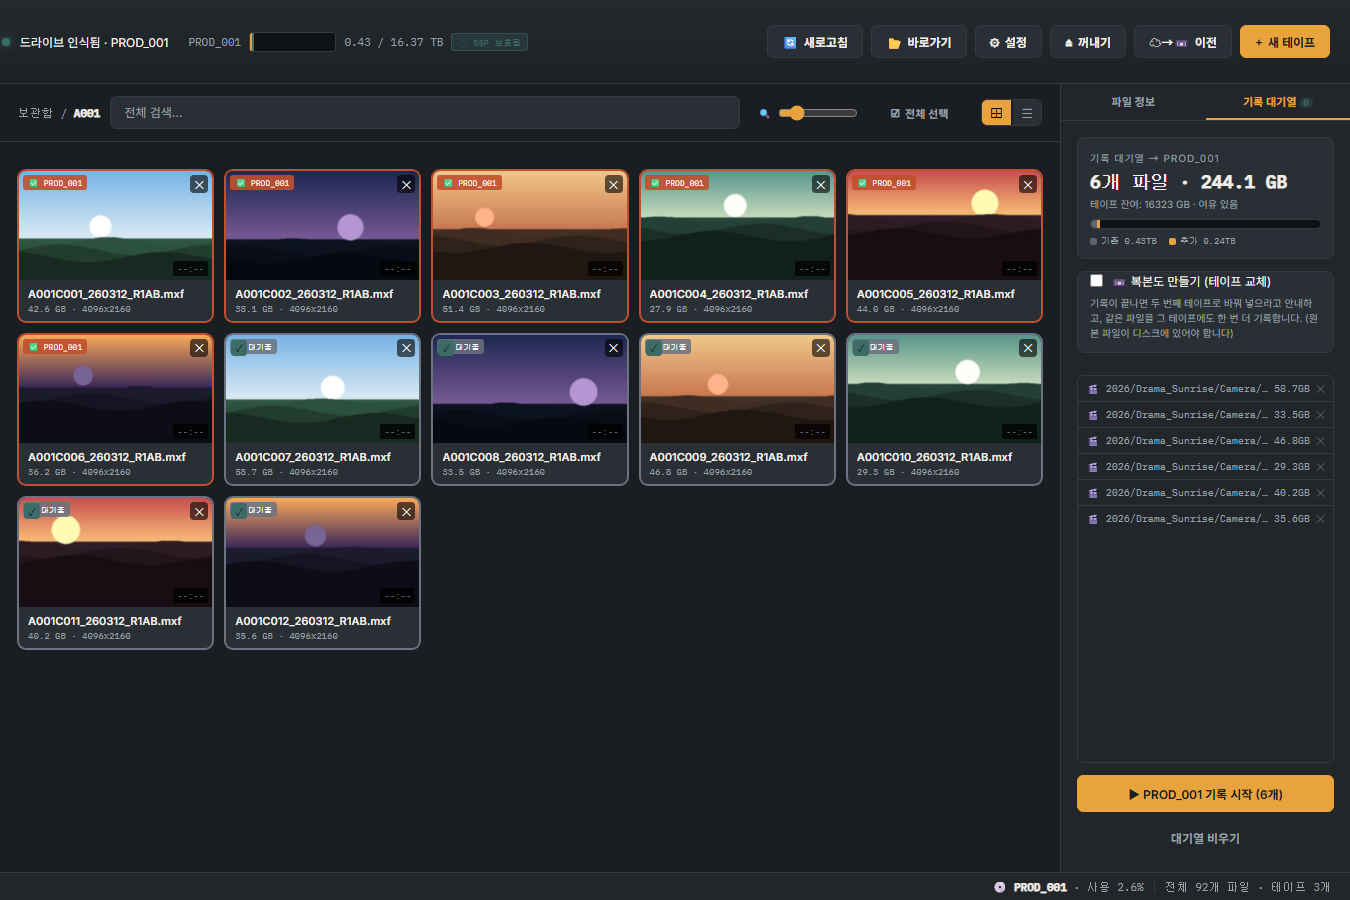
| Right | Details and actions for the selected file, and the write queue of files to be written to tape. |
| Bottom progress bar | Write/restore progress, size processed, speed and time remaining. |
Folder tree tips
- Use the ▶ arrow to collapse/expand. Folders below the top level start collapsed; folders you expand stay expanded next time.
- At startup the last folder tree is shown first and refreshed a moment later.
- Drag the borders between panels to resize the left/right panes and the tree/tape list (double-click a border to reset).
- When you select a folder, its subfolders appear as shortcuts at the top.
Drive status messages
| Message | Meaning / what to do |
|---|---|
| Drive detected · (tape name) | The tape is ready to use. |
| Reading tape (1–3 min) | The tape is being read. Please wait. |
| Please insert a tape | The drive is connected but has no tape. If you just inserted one, click Refresh. |
| Unformatted tape | A new tape. Format it when asked. |
| LTFS letter not assigned (Windows) | IBM SDE lost the drive letter. TapeVault reassigns it automatically. |
| No drive | Check power, cable and HBA driver. Right after power-on the drive may show this for about a minute. |
Inserting a tape
Insert a tape and TapeVault detects it automatically (usually 1–3 minutes). On Windows, if IBM SDE loses the drive letter after a reboot, TapeVault restores the previous letter automatically.
Formatting a new tape
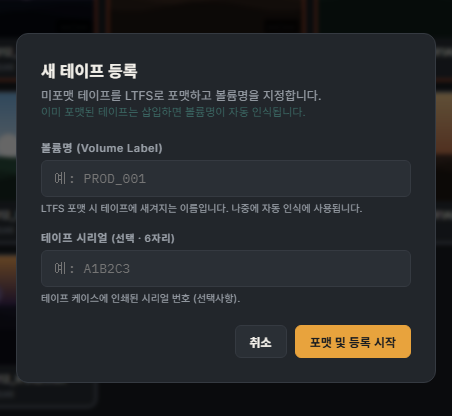
- When you insert an unformatted tape, TapeVault asks whether to format it. You can also use + New tape in the top bar and enter a volume name.
- Use only uppercase letters, digits, _ and - in volume names. Example: PROD_001
- Formatting takes a few minutes; the tape is detected automatically afterwards. With two drives, check the target drive number in the confirmation.
Re-formatting a used tape
Settings → 🧹 Format tape. Type the tape name to confirm; the tape is formatted and its records are removed from the catalog.
Creating folders
- Click + above the tree, or right-click an empty area → New major folder for a top-level category (e.g. 2026).
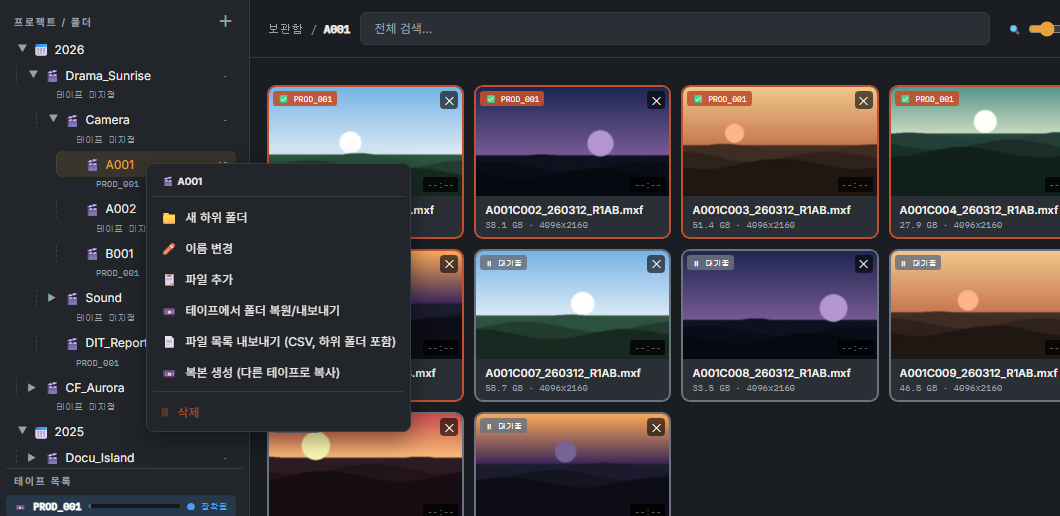
- Right-click a folder → New subfolder — any depth is allowed. Rename and delete are in the same menu; deleting a folder keeps the file records.
- Drag a folder onto another folder to move it inside, or onto an empty area of the tree to make it top-level.
Adding files
- Drag folders or files from Explorer (Finder) onto a folder in the tree or onto the card area. The subfolder structure is recreated in the tree.
- Or right-click a folder → Add files and choose a source folder (subfolders included).
- Hidden and zero-byte files are skipped automatically. New files are Pending; thumbnails are created for video and images.
Adding to the write queue
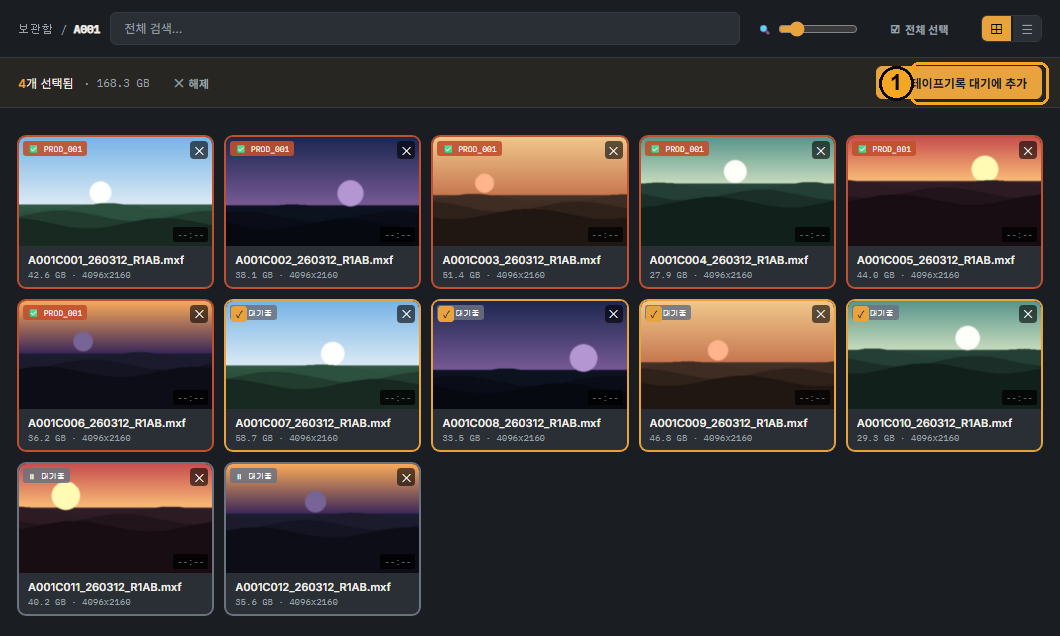
- Select cards (Shift/Ctrl·⌘-click or drag a box) and click 📋 Add to tape write queue.
- Drag cards or a tree folder onto the right panel — a folder adds the pending files of all its subfolders.
- Drag files from Explorer (Finder) onto the right panel — they are registered in the current folder and queued.
Starting the write
Check the list and size in the write queue and click ▶ Start writing. Each file is written to tape, then read back and verified. xxHash64 and MD5 of the source are calculated while copying and compared with the values read back from tape; only verified files keep their final name.
Good to know
- If no tape is loaded, TapeVault first asks whether to write to the local archive.
- If you close the app while writing, it finishes the current file and quits; the rest can be resumed next time.
- Re-queue failed files with Retry transfer on the card.
- The write may appear to pause for a few minutes while the drive retries. Wait — it continues on its own.
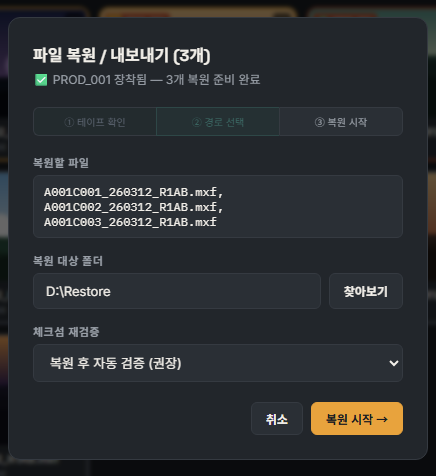
Restoring files
- Find and select files in the search box or the tree (multiple selection is fine).
- Click 📼 Restore / Export and choose where to save.
- The tape must be loaded; if it is not, TapeVault tells you which tape to insert. Restored files are verified against the original checksums.
Restoring a whole folder
Right-click a tree folder → Restore / export folder from tape (or 📼 Restore folder at the top of the folder view). Files of the folder and all its subfolders are restored with the original folder structure. If they span several tapes, files on the loaded tape are restored first; run it again for the rest.
Exporting a file list (CSV)
Right-click a tree folder → Export file list. Every file in the folder and its subfolders is saved to one CSV: folder path, file name, size, tape, copy tapes, status, duration, resolution, codec, fps, checksums and archive time. It opens cleanly in Excel.
- One drive: turn on 📼 Also make a copy (swap tape) in the write queue. When the first tape is done, TapeVault asks you to insert a second tape and writes the same files again.
- Folders already on tape: right-click a tree folder → Create copy. Files already on the target tape are skipped; only missing files are written.
- Copies can be made while the source files are still on the computer.
Write modes with two drives
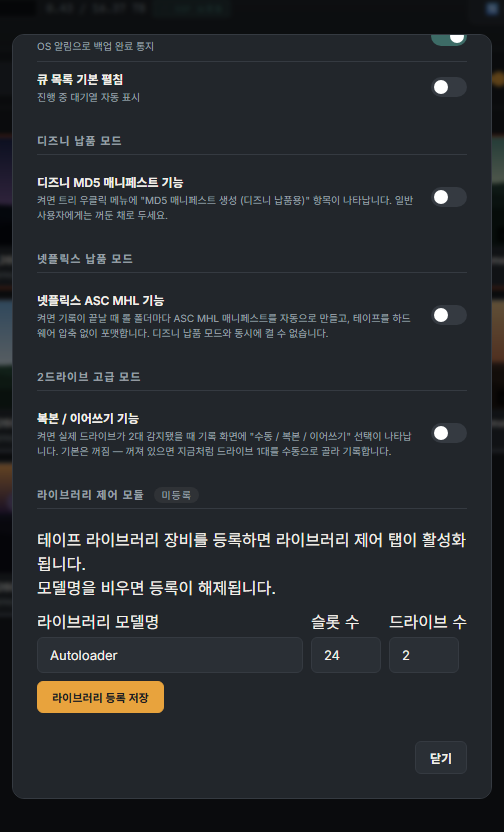
Turn on Replication / Spanning in Settings. When both drives have a tape, choose the mode in the write queue.
| Mode | Behavior |
|---|---|
| Manual (default) | Writes to the drive selected in the top bar. While one drive is writing you can start a separate write on the other drive. |
| Replication | Writes the same files to both tapes at once. The source is read once and each tape is verified separately; speed follows the slower drive. |
| Spanning | If the files do not fit on the selected tape, the overflow continues on the other drive's tape. |
TapeVault creates manifests on tape automatically to match studio delivery specs. The two modes cannot be on at the same time.
| Mode | What it does |
|---|---|
| Disney delivery mode | Turn it on in Settings. Files are written without the top-level (year) folder, and after each write a FolderName.md5 (MD5 Manifest v1.1) is created or updated at the tape root for each category folder. |
| Netflix delivery mode | Turn it on in Settings. Files are written without the top-level folder and new tapes are formatted without hardware compression. After each write an ASC MHL v2.0 (xxHash64) is created, or a new generation added, in ascmhl/ of each roll folder. |
- Manifests are built from what is actually on the tape, and are also created for copies and migrations.
- You are warned before writing if file or folder names contain characters the spec does not allow.
- You can also create a manifest manually from the tree folder's right-click menu.
Writing without a tape stores files in the local archive on the computer (cards with a purple border). Later, insert a tape and click Migrate in the top bar, or queue the local files, to move them to tape. You can change the archive location in Settings (existing files are not moved automatically).
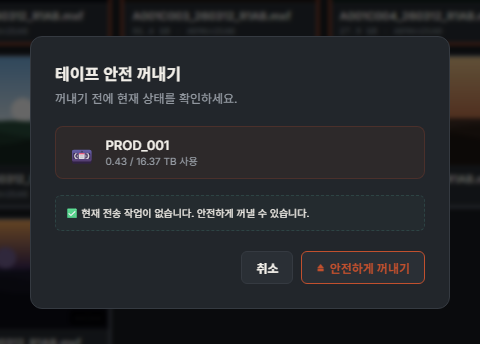
- When you are done, click ⏏ Eject → Eject safely in the top bar.
- The tape index is saved and the cartridge is ejected (usually 30 seconds to 2 minutes). Do not pull the tape out during this time.
- When Tape ejected appears, you can remove it from the drive.
- When you quit: if a tape is still in a drive, TapeVault asks whether to eject it before quitting. Ejecting reduces wear on the drive.
- Unformatted or unrecognized tapes: use Eject unformatted tape in the Eject dialog. If that fails, use the drive's front button.
- Other tape programs (IBM ITDT etc.): TapeVault tells you when one is running and asks again before formatting or ejecting. Sharing a drive can cause "device busy" errors, so close them first.
- Close any Explorer (Finder) window showing the tape first. If a program is using the tape, TapeVault tells you instead of ejecting.
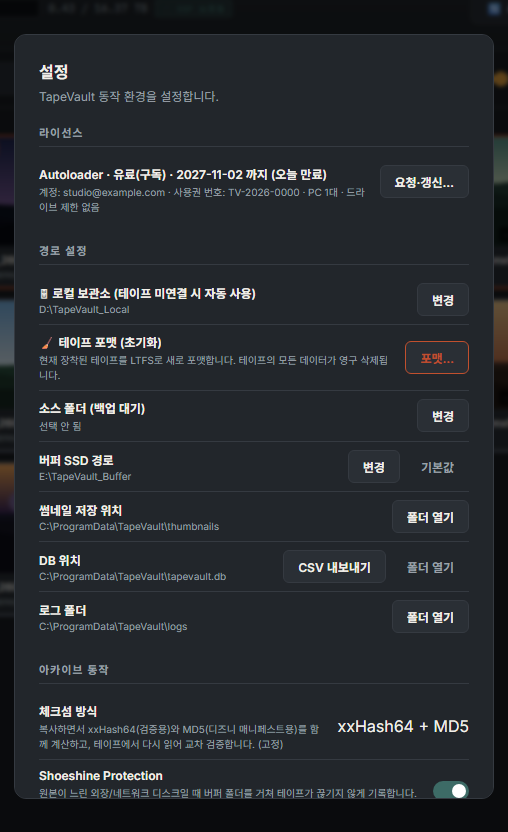
| Item | Description |
|---|---|
| License | Edition, expiry and account; request or renew a license |
| Local archive | Folder used when writing without a tape |
| 🧹 Format tape | Re-format the loaded tape |
| Buffer SSD path | Temporary folder used when the source is a slow external or network disk |
| Thumbnail / DB / log location | Shows the actual folders and opens them. The DB item can save a catalog report (CSV). |
| Checksum | xxHash64 (verification) + MD5 (delivery) calculated together |
| Shoeshine Protection | Uses the buffer when needed so the tape keeps streaming |
| Auto thumbnails · notifications | Automatic thumbnails and job-complete notifications |
| Language | Korean / English |
| Disney · Netflix delivery mode | See Delivery modes |
| Replication / Spanning | Choose the write mode with two drives |
| Library (Windows · Autoloader) | Register a tape library (autoloader) model and the Library tab appears. |
| Symptom | Solution |
|---|---|
| "No drive" keeps showing | Check drive power, cable and HBA driver. On Windows check the tape drive in Device Manager and the IBM SDE install; on macOS check ltfs -o device_list in Terminal. |
| Tape inserted but "Please insert a tape" | Wait 1–2 minutes and click Refresh. If it persists, re-insert the tape. |
| "LTFS letter not assigned" (Windows) | Wait a moment — TapeVault reassigns the letter automatically. If it persists, restart the app. |
| Eject failed — tape in use | Close the program named in the message (Explorer/Finder window, another tape program) and eject again. |
| Writing seems stuck for minutes | The drive may be retrying. If it happens often, clean the head with a cleaning cartridge and compare with another tape. |
| "This license is not registered to this PC" | Turn the network (Ethernet / Wi-Fi) that was on during activation back on and restart the app. If it persists, contact support. |
| No thumbnails | Make sure ffmpeg is installed. Zero-byte files and files without a source cannot have thumbnails. |
| SmartScreen warning when running the Windows installer | The installer is signed by VETERAN IT. Check that the publisher is VETERAN IT, then click More info → Run anyway. |
When reporting a problem, open Settings → Log location → Open folder and send the log file for that day (tapevault_YYYY-MM-DD.log) with a screenshot.
For questions or problems, email support@tapevault.net. Including a screenshot and the log file helps us respond faster.